Title here
Summary here
Follow these step-by-step instructions to deploy ENBUILD locally using Iron Bank images for testing.
Ensure that you have access to a Kubernetes cluster and obtain the KubeConfig file.
You can use rancher-desktop or k3d to spin up a local Kubernetes cluster.
The Helm streamlines and automates Kubernetes deployments by managing charts, enabling users to easily package, version, and deploy complex applications.
Vivsoft has released the ENBUILD Container images in Ironbank in order to pull these images, you need to register in Ironbank and create credentials.

Following are the steps you will need to take to deploy ENBUILD to your Kubernetes cluster.
To add the ENBUILD Helm chart repository, run the following command:
helm repo add vivsoft https://vivsoftorg.github.io/enbuild

"vivsoft" has been added to your repositories
❗ Note: If the helm repo is already present on you machine , update it to get the latest version
❯ helm repo update vivsoft
Before deploying ENBUILD to the Kubernetes cluster, you will need to create a custom values.yaml file so that we can specify configurations unique to this deployment.
For local deployment however we require minimum deployment values.
❗ Note: For more information about the complete set of ENBUILD Helm values click here!
Refer to the example helm input file to be used to pull images from IronBank for guidance.
Make sure to replace the REGISTRY1_USER_NAME and REGISTRY1_PASSWORD , with your registry1 credentials. AppVersion with the ENBUILD application version you want to install. ( Make sure the images with the selected tags are present in IronBank)
Make sure you update the values input to reference the values you created in Step 2.
Execute the command below. Adjust the --set global.AppVersion=1.0.21 to the version you want to deploy and ensure the --version matches the version of the chart you want to deploy.
helm upgrade --install --namespace enbuild enbuild vivsoft/enbuild --version 0.0.36 --create-namespace -f target/quick_install_ib.yaml --set global.AppVersion=1.0.25

Release "enbuild" does not exist. Installing it now.
NAME: enbuild
LAST DEPLOYED: Fri Mar 22 17:37:23 2024
NAMESPACE: enbuild
STATUS: deployed
REVISION: 1
TEST SUITE: None
NOTES:
1. Get the application URL by running these commands:
  echo "Visit http://127.0.0.1:3000 to use your application after starting the port forward"
  kubectl --namespace enbuild port-forward svc/enbuild-enbuild-ui 3000:80
Use the following commands to validate the ENBUILD pods are up and running.
kubectl get pods -n enbuild

NAME                                       READY   STATUS    RESTARTS         AGE
enbuild-enbuild-genai-8488c86d6f-csfmn     1/1     Running   0                76m
enbuild-enbuild-ui-56f5667d5b-4xckt        1/1     Running   0                76m
enbuild-mongodb-0                          1/1     Running   0                76m
enbuild-rabbitmq-0                         1/1     Running   0                76m
enbuild-enbuild-backend-66676f8cd8-hxtbr   1/1     Running   0                76m
enbuild-enbuild-user-b87d95b45-c79p6       1/1     Running   0                76m
enbuild-enbuild-request-7c47c6d67b-j2fnd   1/1     Running   1 (73m ago)      76m
enbuild-enbuild-ml-6f944ff759-ztdj6        1/1     Running   1 (73m ago)      76m
enbuild-rabbitmq-1                         1/1     Running   0                73m
enbuild-rabbitmq-2                         1/1     Running   0                72m
enbuild-enbuild-mq-575c965764-zcnlg        1/1     Running   18 (6m24s ago)   76m
❗ Note: You might see restarts of the enbuild-enbuild-mq-* pod until the RabbitMQ service is up and running.
Validate the ENBUILD services are setup correctly
kubectl get services -n enbuild

NAME                        TYPE        CLUSTER-IP      EXTERNAL-IP   PORT(S)                                 AGE
enbuild-rabbitmq-headless   ClusterIP   None            <none>        4369/TCP,5672/TCP,25672/TCP,15672/TCP   80s
enbuild-mongo               ClusterIP   10.43.230.6     <none>        27017/TCP                               80s
enbuild-enbuild-user        ClusterIP   10.43.140.228   <none>        80/TCP                                  80s
enbuild-enbuild-ui          ClusterIP   10.43.110.47    <none>        80/TCP                                  80s
enbuild-enbuild-backend     ClusterIP   10.43.146.20    <none>        80/TCP                                  80s
enbuild-rabbitmq            ClusterIP   10.43.54.197    <none>        5672/TCP,4369/TCP,25672/TCP,15672/TCP   80s
Use the port forwarding command to access the ENBUILD UI using your web browser.
kubectl --namespace enbuild port-forward svc/enbuild-enbuild-ui 3000:80

Forwarding from 127.0.0.1:3000 -> 8080
Forwarding from [::1]:3000 -> 8080
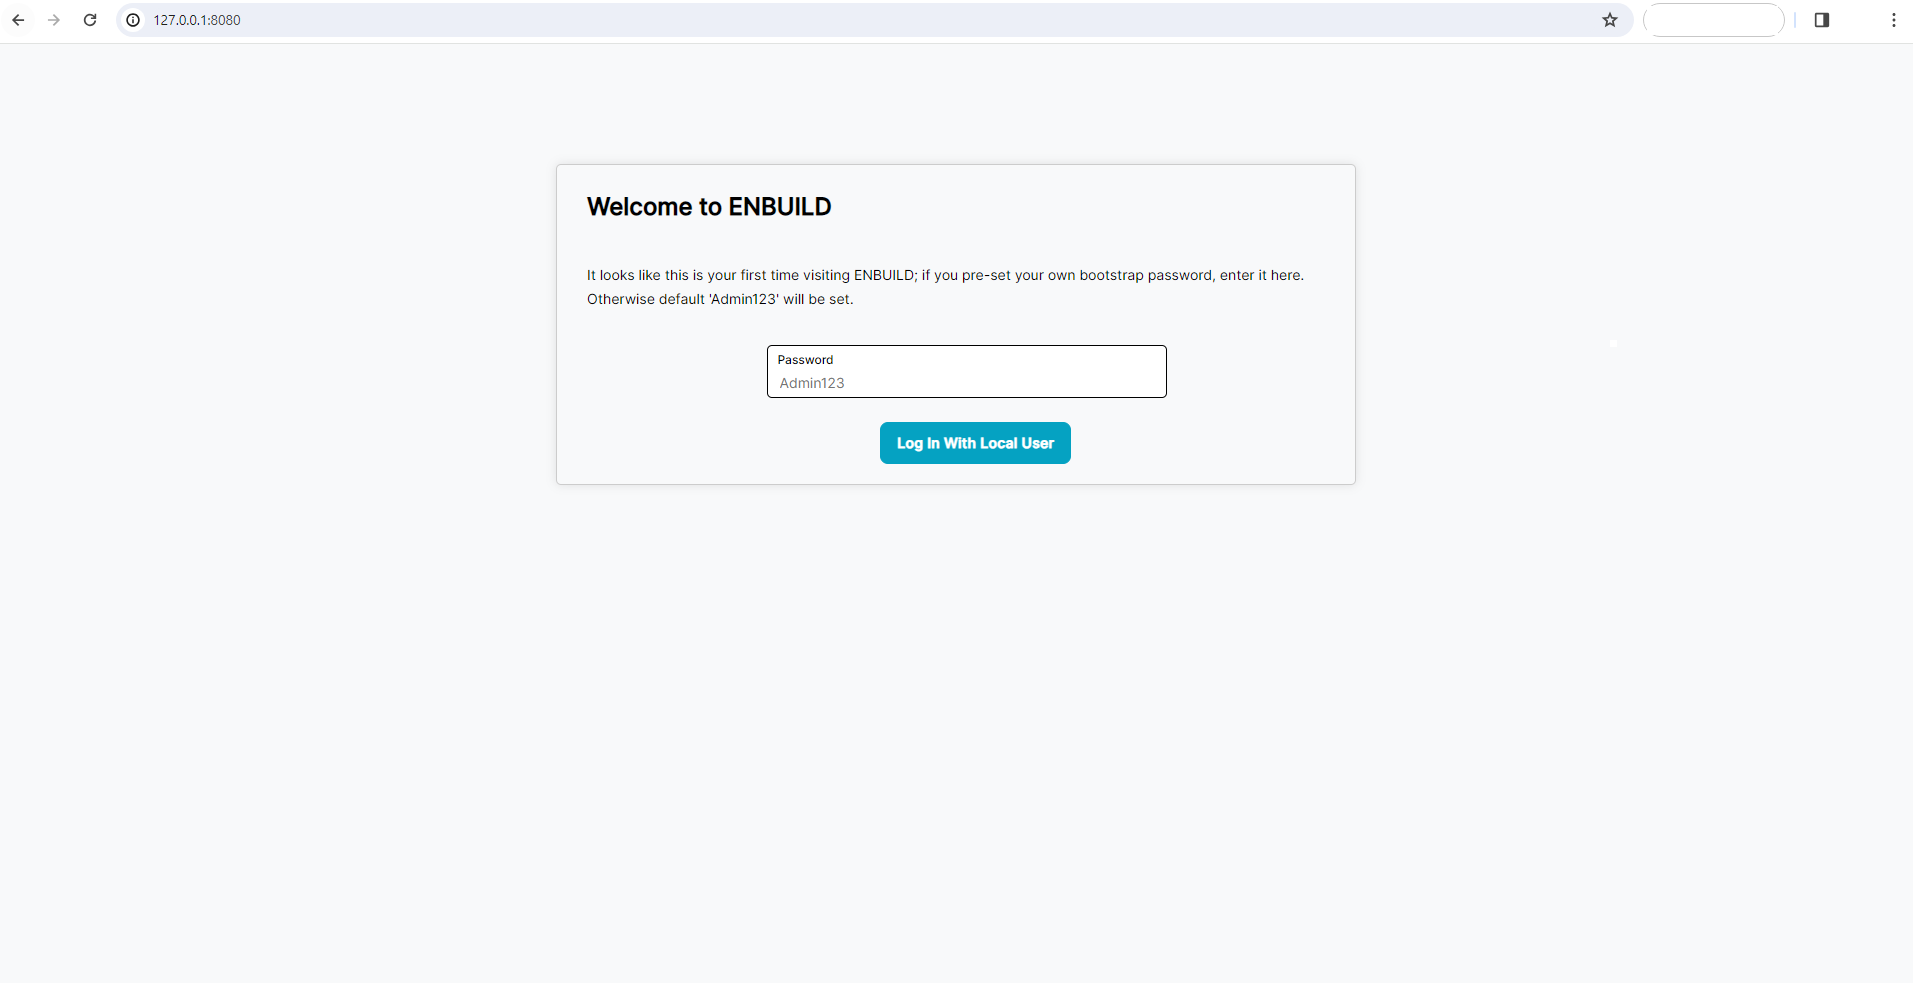
Navigate your web browser to http://127.0.0.1:3000. and set the admin password.
After you set the initial admin password, you should see the ENBUILD home page with BigBang Catalog.
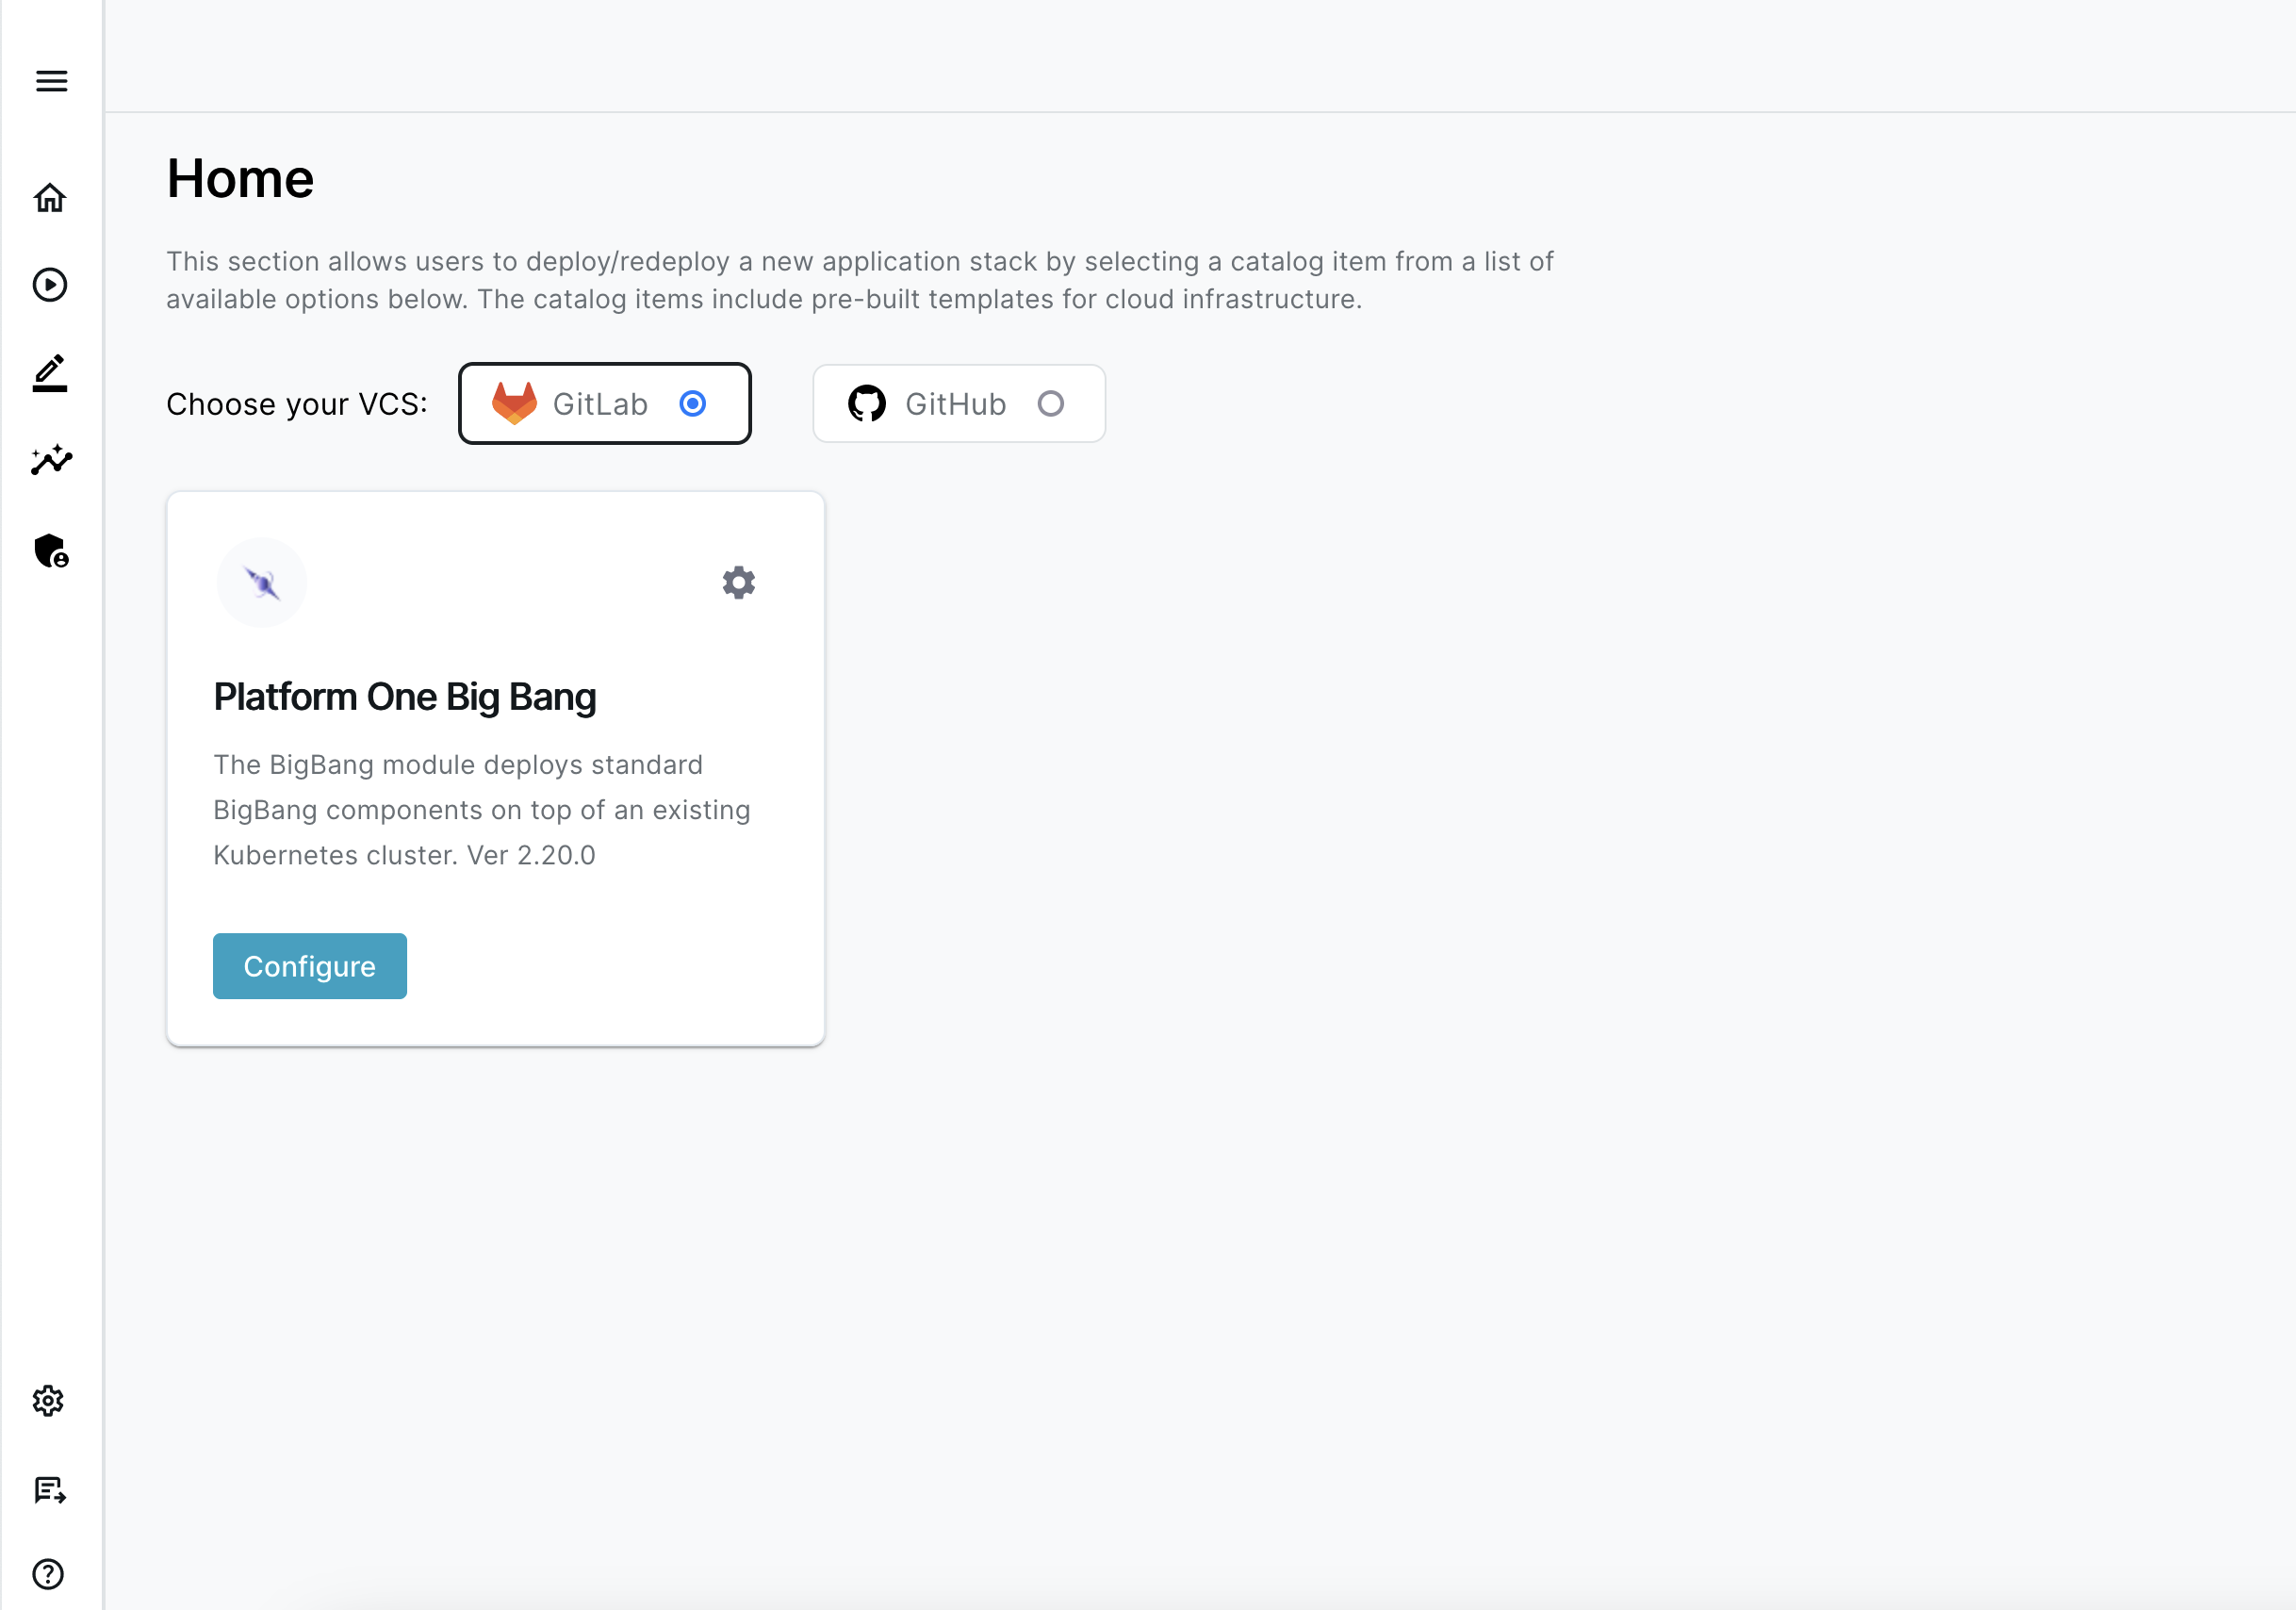
⚡ Proceed to Configureing ENBUILD
Use the following command to uninstall ENBUILD from your Kubernetes cluster.
helm uninstall enbuild -n enbuild

release "enbuild" uninstalled